When you click on links to various merchants on this site and make a purchase, this can result in this site earning a commission. Affiliate programs and affiliations include, but are not limited to, the eBay Partner Network.
With limited slips on both axles, it was critical to get a same-sized spare tire. I wanted to mount it in the stock location so I decided on reusing the OEM 18" spare rim, electing for the same Ridge Grappler but in 285/75R18 sizing, which should put it at just about a quarter inch taller according to Nittos specs, but is 1" narrower to help keep it as low-profile as possible under the bed.
The big question that has been asked on the forums on numerous occasions: will a 35" fit? The answer was a "yes" because the Raptor uses a 34.5" spare, but those that did put one in a stock F150 install had taken out the aluminum heat shield.
I was able to squeeze it in WITH the heat shield in place!
However, with my Mag-Hytec cover, the spare rides very close to it, with the spare snugged up as far rear-ward as possible:
The angle of the axle may make it seem it would contact the tire at full compression, however, since the axle is rotated from the plane of the leaf springs, it actually should not get any closer regardless of wheel travel, except perhaps during an extreme axle-wrap situation. I may look into installing an Add-A-Leaf to help limit axle-wrap.
The good-thing with keeping the heat shield is that it prevents it from shifting closer to the axle.
I received my HaloLifts 2.25" blocks, which are 1.25" shorter than my ProRyde stack, but I'll hold off on the swap in order to keep the axle as far away from the spare with the taller blocks.
When I started offroading, it was obvious that we had to have positive comm with everyone in the column at all times, of which they were all using HT ham radios (cheap Baofeng UV-5s). In addition, it was imperative to have a good offroad mapping app or two; some are using AllTrails (free version), another is using OnX, but I settled on Gaia GPS since it appeared to be the most popular for off road, and, unlike the other apps, I could pre-plan our routes on the website using my computer, print hard copies to have as manual backup, then switch to the Gaia GPS app when on the road. And of course, as many others are wont, I wanted to document our trail adventures via an action camera, which at this time is attached to a GoPro suction mount onto the windshield.
But it was getting extremely tiresome having all this tech lying haphazardly on the center console with a rats nest of wires. The BuiltRight Dash Mount seemed like the perfect solution. Quite a straight-forward and simple install, there was one screw that didn't seem to fit very well into one of the captive clips; it almost looked like the threads were being stripped.
On the mount itself, I bolted three RAM Mount B-ball AMPS Plates: one for my HT radio; the second for an eventual Garmin Overlander GPS, and the third for my iPhone utlizing a RAM Mount Large X-Grip.
Currently, a Baofeng UV-82 Tri-Power with ComMountain Speaker Mic is serving as my primary comm, but I will be switching to a permanent-mount BTech UV-50x3 when I get all the components together. The UV-82 is clipped onto a double-socket arm RAM mount, the end of which is a JeepUniq RAM dual-mount holder specialty built for specific devices:
Though I didn't know it at the time, the Sync 3 retrofit I had performed at the top of the year turned out to be one the best mods for my comm gear because of its CarPlay compatibility (CarPlay was not one of the reasons I did the retrofit for, and wasn't using it until I got Gaia). With it, I can access my Gaia GPS, or any other GPS app, directly on my Sync 3 touch-screen, with all audio being routed to the truck's speakers:
This setup is still a little busy, but I'm hoping with the UV-50x3's remote head, it will be less cluttered as the UV-82 is quite tall and bulky, even with it's ultra-thin Super-Elastic Signal Stick antenna.
I will also be installing USB and 12V cigarette ports on the dash tray to get the wires up and out of the way.
Last edited by Augster; 07-26-2020 at 02:39 PM.
Reason: Added links
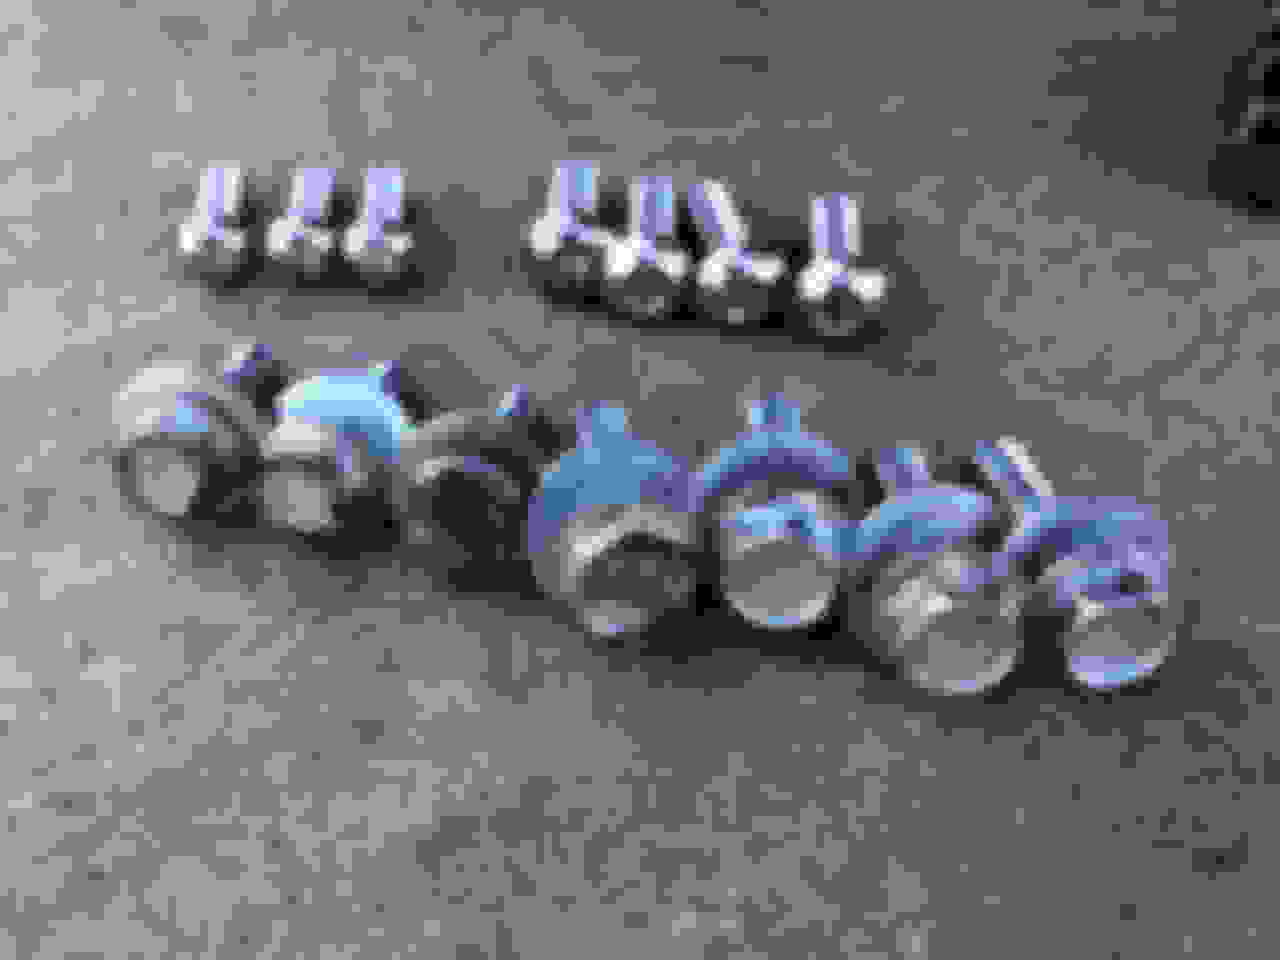
Through three months of offroading on a weekly basis, I quickly learned what I could and could not navigate with my practically bone stock long bed. As mentioned in previous posts, the RCI skid plates were taking a severe and constant beating and I've had to replace its bolts, especially the ones for the transfer case skid plate, a couple times already due to the heads being smashed and sheared:
I even tried swapping to button-heads thinking they would be more resistant to being damaged to the point they would be difficult to remove; nope, they got just as smashed and were even more difficult to remove. Unlike hex bolts, which could be "fixed" with some hand filing, the button-heads required a Dremel with a thin abrasive cylinder to open up the hex bore enough to get a hex wrench in. Nothing would resolve my low break-over/ramp-over angle inherent with long bed pick-ups other than raising the vehicle.
The other difficultly I experienced with stock ground clearance was the departure angle: the long over-hang of the F150's bed creates a very shallow departure angle of only 23.7 degrees stock. I had to avoid a few climbs that others in the convoy could do because I'd bash my hitch receiver/electrical receptacle. As I was brainstorming my brilliant idea of custom building a special skidplate welded to a standard hitch mount, I stumbled across the Sterlings Wild West Skid Pro promo video:
Eh, so much for being the first with my million-dollar idea! They were out-of-stock for the Ski Pro and weren't anticipating starting up production until the new year, but had a few Hitchcock's left, so I promptly ordered one. Upon attaching the shackle, I was dismayed on how loose it was in the anchor hole, with an extremely large amount of side-to-side play (the vertical "hackles" is too narrow for the shackle's throat). Fearing this will cause a lot of noise and vibration on the trails, I shored it up with a rubber isolater and four washers I had from a kit, but it still needs more washers to take up the remaining slack. Beyond this issue, it was solidly built and seemed like the perfect solution for my departure angle scrapes:
But just before I had a chance to mount the Skid Pro, a competing product dropped in my lap for free (it's fantastic having a contact working at a local off-road shop!): a Body Armor Backbone Universal Hitch Skid:
This thing is pretty nifty in that it can serve as a step, a wheel chock, a recovery point (though a shackle can be looped onto the step, it would probably damage the finish, so a synthetic shackle would be best), in addition to its primary purpose of skid plate with a beefy, very wide and deep "true" skid plate. Compared to the Skid Pro, this is the clear winner in my book:
Yep, the Backbone is a keeper, as it provides more skid protection of the trailer wiring receptacle, though, the unique look of the Skid Pro Hitchcock would probably be more of a conversation starter (I still pack the Ski Pro with me in my tool bag):
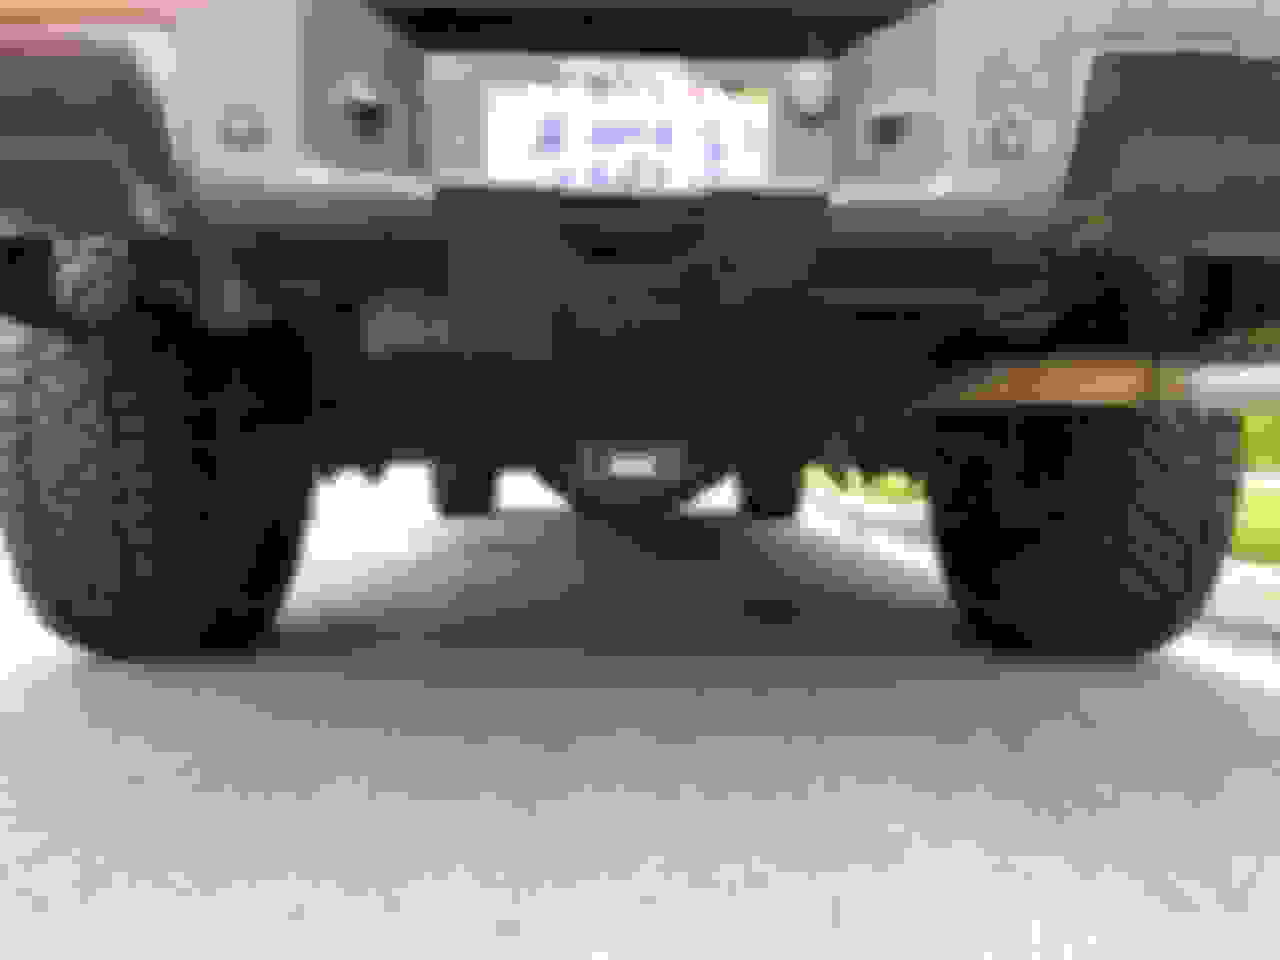
This a good shot of the 35x11.5 R18 Ridge Grappler spare tire: it's really tucked up in there and isn't very noticeable (to me, anyways).
In my thread I posted in another forum, Aftermarket Jacks, I was wary of using the OEM scissors jack with 35's AND under precarious off-road conditions. The concerns are clearly illustrated in this video demonstrated with a 13th gen Raptor on flat pavement with a slight incline:
In the interim, I went with a Harbor Freight 3-ton aluminum jack fitted with a James Way jack skid and quick-release mounting plate system (an incredible $150 shipped!). The James Way skid is unique in that it allows the retention of the HF wheels so the jack can be used both on hard surface roads as well as offroad:
I attached the mounting plate to some scrap siding to keep it from sliding around on the bed mat, which the whole rig is strapped down at the front of the bed under a moving blanket to keep dust to a minimum.
I'll eventually add a bottle jack to my recovery gear, which would be more useful than a floor jack for certain situations, and probably swap out the HF floor jack with a Pro Eagle 3-ton Big Wheel for better off-road mobility.
Since my recovery gear tool kit includes power impact guns, drivers along with the requisite sockets, I decided to also replace the OEM spare tire winch rods and handle with a standard 1/2" drive long extension. The OEM winch rod square ends are bigger than 3/8" drive but smaller than 1/2", and assembled to reach out just past the bumper, measured 18" long. Since a 1/2" drive female socket end is too large to fit into the winch rod funnel leading to the spare tire winch, it had to be a continuous extension, so I bought a cheap 24" long, 1/2" drive impact extension off Amazon and ground down the three flats (left the ball-detent side alone) to the proper size on a bench grinder. Works perfectly and with power tools, makes dropping and raising the spare quick and easy:
It's been a couple weeks now since my maiden shake down cruise in the mountains of San Jacinto (an elevation climb of +5,500 feet) of the completely revamped suspension (sans new rear shocks), and all I can say is, "wow." There has been such a drastic change in offroad handling which I'm still awed today two weeks later. The jarring sharpness of ruts and bumps have been greatly reduced, which my girlfriend commented how much smoother the ride was on the trails. The additional 4 inches of ground clearance resulted in no dreaded screeches and impacts at all to the skid plates on this moderate trail, which has instilled confidence in traversing more technical trails in the future; trails that I've so far shied away from whenever I could.
During my pre-trail planning and inspection several days before, I discovered that the tire valves on the Mavericks were in the center of the rim, completely vertical and facing towards the hub. This orientation prevented me from using my straight-body tire pressure gauge. I quickly ordered up a set of 90-degree adapters on Amazon that had 1-day shipping, arriving just in time for the trip:
It worked, however, I now have to use two hands with my current pressure gauge, with my other hand supporting the valve stem as I'm pushing the pressure gauge into the adapter. I've got a new Jaco tire pressure gauge on order that I will install a quick-release latching tire chuck onto so I don't have to keep one of my hands constantly on the chuck when reading the pressure.
I'm currently using the uber-expensive ($110 with tax) J.T. Brooks Automatic Tire Deflator PROs for airing down: STAY AWAY FROM THESE. Mine are inaccurate, require constant attention and monitoring to initiate deflation, maintain deflation, and to stop deflating at the preset pressure (I once stepped away and a couple of these continued airing down way past the setting I pre-checked back home). I thought they would save me time and be the first one done airing down my tires doing all four at once, but I always end up last with the rest in the column sitting in the vics waiting for me to finish.
Speaking of tires, the 35" Ridge Grapplers were phenomenal, both on and off-road... Until I had to replace all four brand new Motorcraft TPMS sensors after two weeks: they just stopped working and couldn't be read any more by diagnostic tools. Had my Discount Tire replace all of them with a set of their aftermarkets and so far so good after two weeks, however, the wheels now feel a little twitchy and more prone to slight judder from bumps and irregularities on the highway. I had them rebalance all fours but it's just not the same from the first two weeks before replacing the sensors; the steering wheel just doesn't stay absolutely still and smooth as butter like the first time. It's not bad or serious, but it is something I noticed a nuanced difference in...
This is awesome, loving what you're doing with the truck and a lot of your mods line up with what I'm headed for.
I'm in a 2013 Lariat 4x4, max tow pkg with 3.73 gearing and 6.5ft bed.
I'm planning on building a bed rack that works with my Peragon cover in a few months, that will host my ABS shower, awning and recovery gear while also being able to load dirt bikes & motorcycles. Well, that's the plan.
Sub'd!
Thanks, and let me know how that rack turns out. There doesn't appear to be a whole lot of built long-bed offroading/overlanding F150s so we're an exclusive group.
I need the security and protection of a bed cover but the existing off-the-shelf racks will not work with a folding cover, which is understable due to the sloping, sleek sides of a typical rack versus the tall vertical rectangular height a folding cover needs for opening. I could either get a custom-made rack that's designed to slide into the factory stake-bed pockets but would still prevent the cover from being opened, or go with a bed cap.
The bed cap is my least preferred method, though it would allow me to stack stuff high in the bed as well as packing taller gear. I would need to structurally improve the weight bearing capacity of a bed cap with an internal metal support resembling a bed rack, and would probably provide exterior, side hard-mount rails for pioneer and recovery gear. The pros of using this improved bed cap system: 1) I can install a Decked drawer system and still have plenty of protected storage above it; 2) I can mount a full-length (extending from front windshield all the way back to the tailgate) "batwing" style of awning as I would also install a roof rack that extended to the front of the cab from the bed cap.
This full-length roof rack is exemplified by this Topper Rack and would be mounted solely on the bed cap to allow cab/bed articulation, but would be custom-built to my specs. This roof rack would also allow me to easily mount an LED light bar in front:
If I stick with a bed cover and go with a custom bed rack, I don't want to lose valuable bed space with a traditional retractable cover which uses a relatively large cassette drum (besides which, I got tired of fishing for the pull-strap to pull-out the cover, sometimes having to climb into the bed to ****** it), so my only cover option would be to swap in a BakFlip Revolver which rolls up on top of itself. It may not be able to roll up all the way to the back window with a rack in place as it gets taller, but should be close enough for me to gain access to what I need in the bed.
This is my end-goal plan anyways. We shall see where it takes me and how far I get...
So my truck likely won't make it nearly as off-roady as yours and by that I mean the new differentials are certainly awesome!!
That may be something I look into if one of them grenades themselves further down the line.
The suspension is definitely something I want to do, as a max tow pkg, bumps are very bouncy unless the truck is fully loaded down; so may be looking at a kit similar to yours.
I personally have Falken Wildpeaks AT3W 285/70/17s on the XLT wheels of a past model. They've been awesome!
I use a Baofeng UV25x4 mounted in the center console (goal is to only bring out the handset when needed... wish I could find a handset that had a speaker built in so I don't need the lid up all the time), with a NMO ~36" GMRS whip mounted on the bed rail of the rear. Super easy bracket I whipped up temporarily while I await my new bed solution..
I want to find myself some RCI skid plates then rock sliders, I think ADD has some for the newer model trucks that should retro onto our trucks with slight modifications (says me with literally 0 evidence, optimistic).
Eventually, a Full Race Intercooler to move the existing IC up and out of the lower valence (which I already have a Stedi light bar mounted in). This would be in prep for a new front and rear low profile/high clearance bumpers..
I acknowledge that our 157" wheelbase trucks are the 1% of trucks that have off-roading capability, but I like to still play where I can
Now.. about the bed solutions, I unfortunately have way too much research saved up so feel free to pick my brain if you'd like.
Before I go down the rabbit hole, I want to use my truck to carry both my street motorcycle and dirt bike to track/dirt trails when wanted with little work needed.
Want to be able to throw a bed rack on that will hold an awning and shower almost full-time, in the winter time snowboard racks. Maybe, even a waterproof case that will hold recovery gear. Side panels may hold Rotopax type of tanks.
I went through a Tyger T1 (soft roll-up), but ultimately didn't like it because security, loved it for compact and I could fit my bikes in without the tailgate down. This also blocks the stake holes.
I had a retrofitted retractable hard cover, but didn't like how the canister was taking up ~1ft of bed space. Though, having milk crates underneath was perfect because I could hold straps/tie-downs in the bed at all times with little to no space loss (since it was already unusable space).
I highly considered the Bakflip series, and it was my top pick until I realized the cover (when folded against the cab) would block my view of the rear.. No big deal, unless I'm carrying bikes and I like to keep an eye on them in case I hit a bump too fast, want to make sure the bikes aren't falling out of the bed/tilting too much. This leaves the stake holes open, so can mount racks.
Ordered a Peragon cover (peragon.com) which is a retractable hard cover but folds into the bed. The panels are removable off the rail in under 30 seconds, so they claim.
I have a buddy who uses his daily as he does HVAC work and the only complaint is that you don't want a milk crate or anything else blocking where the panels would fold (first 8" of space front of the bed), as then the item needs to be removed before the panels can be folded.
I plan on remediating this by cutting some height off milk crates and keeping them under the panels. When carrying bikes, I can chock the bike against the panels or remove the panels and have them lay parallel to the bike or leave them in my garage. This also mounts to the inside of the rail and leaves the bed rail/stake holes open.
Initially, I was going to rivnut into the bed rail, use mounting plates and weld my rack to the mounting plates. Two hoops, side panels and it will do exactly what I want without needing to mount to the bed rail in most native ways.
I've since started highly considering the Adarac Aluminum Pro series... These will mount via stake holes, lay down a utility rail (awesome for more tie-down points), and have uprights that look like they can be drilled and tapped for a side panel.
As you can tell, I plan on using my truck for all possibilities so modularity is huge for me. Also, the ability to take the rack off by myself and with few tools (in case I need to prep the truck solo for a trip).
I don't plan on using the bed rack all the time, as I fear it will cause issues MPG and theft, so the ability to easily stow and build is key here.
Some pictures of a quick mockup in CAD, this may or may not show well what I was planning on doing... Some easy 2x1x0.120 rectangular steel, angle cut for the base, angle cut for the welded joints up top and you've got two big hoops! Some bar stock for the mounting plates, rivnuts for it to secure to and you've got a rack!
Note, this doesn't show the mounting plates that would be welded to the rectangular tube and lay flat against the bed rail where I use rivnuts and bolts for securement.
Either the Adarac or DIY racks will come up just slightly above the cab height, this is so I can squeeze either street bike/dirt bike into the bed, strapped down while being able to carry a load on the rack. The handlebars stick up just barely past the total cab height
Truck looks so familiar! The rest of my off-road group all use Falken Wildpeaks too, and they have nothing but praise. I would have went with them as well, but the Ridge Grapplers have so much overwhelming positive reviews, both from professionals as well as from regular Joe's, that I was willing to pony up the extra green for them. It has definitely lived up to my expectations, and then some.
Here is a long-bed 12th Gen overland build that I've been following that may be of interest to you since he rides dirt bikes and built his rig specifically with hauling them to his trails:
I really love that Leitner Active Cargo System, but to my dismay, my inquiry to the company regarding any customization to fit a bed cover was met with a definitive "no" as they are not a custom fabrication shop. Their racks clamp on to almost the full length of the bedrail lip so I would need to cut those off and build custom mounting rails. It's something I'm contemplating, but if the cost is too high (rack plus mods from a local shop), I might as well custom build the whole rack but design it so that it can utilize the same adjustable overhead load bars and side accessory mount bracketry.
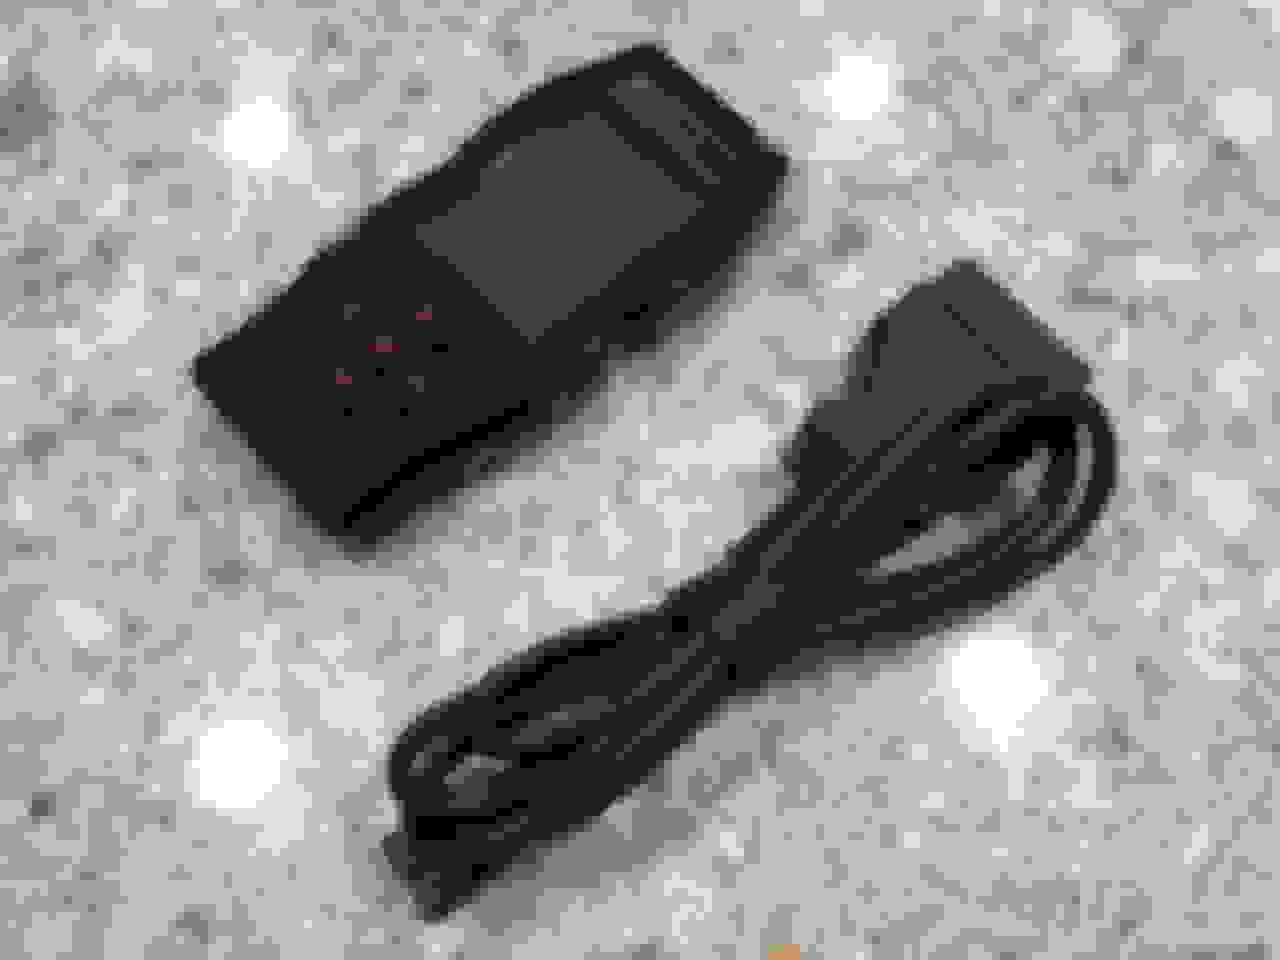
An SCT X4 ready for 5 Star tunes to be uploaded to...
Well actually, this cat dragged it in over a month ago, and I've been running one of their canned tunes for exactly one month now as of today. I wanted to wait until I got sufficient stick-time with it before reporting my observations.
I've never run a tuner before as they were a little pricey (for the highly rated ones) for what I perceived were it's rather moderate performance gains, and I never had a vehicle which I absolutely had to have one for. With new lower gears and taller tires on Dirt Diggler, it was nigh time to invest in a tuner, though the selection of which is now very limited for the 6.2L since the abrupt discontinuation of the MPT 6.2L tunes (leaving existing customers high and dry). That left 5 star as one of the last few reputable 6.2L canned tuners left.
The $450 splurge deposited a brand new SCT X4 on my doorstep, which I immediately opened up and put to use. Without RTFM, it took me awhile to figure out that I had to first plug the programmer in before keying the truck to the on position (if I keyed it on before, which was the first thing I did, it would not update the PCM no matter what). After getting over that first obstacle, and finally after 15 minutes of waiting for it to upload and "reset" the PCM, my first canned 5 Star tune was in: 87 Performance Octane. Time for a highly anticipated test drive!
Unfortunately, it pretty much lived up to my subdued expectations. After taking several trips up and down a low-trafficked backroad, I was left underwhelmed. It didn't give me that kick-in-the-pants thrill that countless others implied in their glowing reviews. But I get it; I undestand it. A tuner can only push the power curve in so many different places across the breadth of the power band just so much; it can't just "make up" gobs of peak power by itself, though it may push it along a little bit. The best way to describe what this tune is doing is that it's essentially raising the lower portions along the power curve that are below peak power higher where it can. The net result is a much wider plateau of power across the spectrum.
Before the tuner, I've been running a Pedal Commaner for almost nine months, and I can definitely say for my vehicle at least, it was the best bang for the buck, literally. In my closing remarks in my thread, 2WD vs 4WD Performance Differences, the perceived performance deficit between my 2WD vs my 4WD SuperCrew 6.2 were just too glaring that I was desperate to find a solution, which the Pedal Commander scarily delivered in spades.
As you can see in the photo above, the Pedal Commander is set to "City" and "+2". For me, this is the best setting for overall incredible throttle response without inadvertently breaking traction (still can happen if I floor it from a dead-stop); anything higher would just be too insane since just a twitch of the throttle could whip my neck back with tires spinning. Downright dangerous under less than ideal traction conditions, such as in rain and on icy roads.
Anyways, with the tune loaded it was only after my daily work commute in the ensuing weeks that I started to appreciate what the tune brought to the table: when the Pedal Commander had "done its thing" of providing instant throttle response with that initial burst of power, the Performance tune takes over and keeps the power delivery smooth and constant. Climbing a long, steep on-ramp for instance: with the Pedal Commander only, once I romp on it and get that first adrenaline rush, it's rather flat afterwards with additional jabs at the pedal not delivering nearly as much punch. But now with the Performance tune, the acceleration just keeps going and going.
Suffice to say, these two in tandem work to compliment each other in pushing the power envelope. If money is no object, I would definitely recommend getting both. But if funds are a little scarce, get the Pedal Commander first, then save up for a tuner, but only after you've made any other performance upgrades, such as exhaust, cams, etc.
 07-11-2020, 03:47 PM